http://oracleebusinesssuite.blogspot.com/ moved to http://oracleebusinesssuite.wordpress.com
Thursday, September 27, 2007
How to enable the Cancel button on Application Login page

The attributes are as follows:
- Username Hint
- Password Hint
- Cancel Button
- Forgot Password Link
- Register Here Link
- Language Images
These attributes are controlled via a single profile option, "Local Login Mask" (FND_SSO_LOCAL_LOGIN_MASK).
In order to display one or more of these optional attributes on the Application Login page, add the numeric values of all desired attributes and then set the value of the profile option to that value "Local Login Mask".
Following is numeric value for each attribute
- Username Hint = 01
- Password Hint = 02
- Cancel Button = 04
- Forgot Password Link = 08
- Register Here Link = 16
- Language Images = 32
If you want to display the Cancel Button on the Application login page, then the profile value should be set to 04 Cancel Button . In order to display just the language images, set the profile value to 32.

Save the record after restarting Application services your login page looks like this

Saturday, September 22, 2007
How to Audit Changes in Profile Options
By using the following query we can get number of profile option changed along with new values in given number of days
Connect as apps user to instance
SELECT '***Profile Option Name ***'
|| a.user_profile_option_name
|| '*** Was Updated with value '
|| '"'
|| b.profile_option_value
|| '"'
|| ' In The Last '
|| &p_no_of_days
|| ' days'
|| ' by '
|| (SELECT user_name
FROM apps.fnd_user u
WHERE u.user_id = b.last_updated_by) mesg
FROM apps.fnd_profile_options_vl a,
apps.fnd_profile_option_values b,
apps.fnd_user c
WHERE a.profile_option_id = b.profile_option_id
AND b.last_updated_by = c.user_id
AND ( b.last_update_date > SYSDATE - &p_no_of_days
OR b.creation_date > SYSDATE - &p_no_of_days
)
Wednesday, September 12, 2007
How to Setup Manual Modifier for Special Charges
Oracle Advance Pricing Facilitate us to define manual adjustments for discounts, surcharges and freight charges. In order to override the selling price directly on the order or apply any surcharge, we must define a manual surcharge.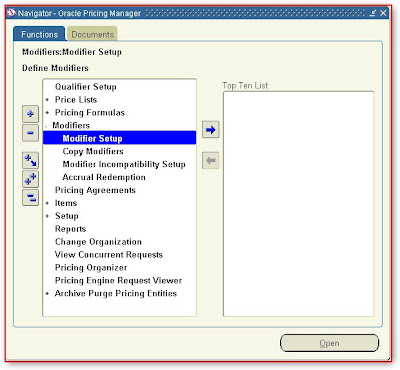

Following are the steps with screen shot that how to define manual surcharge modifier
Define Modifiers
Navigate to
Modifiers --> Modifier Setup
By using Oracle Pricing Manager Responsibility

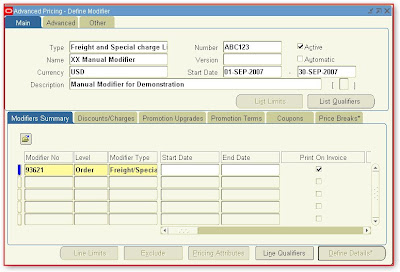
Fill the information as per following
In Header Block on Main (T)
· Type :- Freight and Special charge List
· Name :- XX Manual Modifier (its on your own discretion)
· Number :- ABC123 (its on your own discretion)
· Active :- Check this Box
· Automatic :- Leave Unchecked (To inform system this is a manual modifier)
· Description :- Manual Modifier for Demonstration
In Detail Block on Modifiers Summary (T)
· Modifier Number :- System Will Automatically generate this number
· Level :- Order
· Modifier Type :- Freight/Special Charge
· Pricing Phase :- Header Level Adjustments

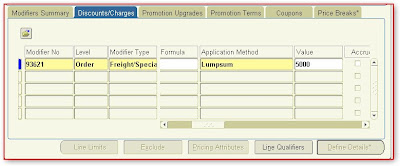
In Detail Block on Discounts/Charges (T)
· Charge Name: - Administration Fees
· Application Method :- Lumpsum
· Value :- 5000

Save all the information
Build Attribute Mapping
Navigate to
Reports
By using Oracle Pricing Manager Responsibility and submit the request named “Build Attribute Mapping Rules” with default parameters

Apply Surcharge on Order
Navigate to
Orders. Returns à Sale Orders
By using Order Management Super User Responsibility
Enter and Save an Order

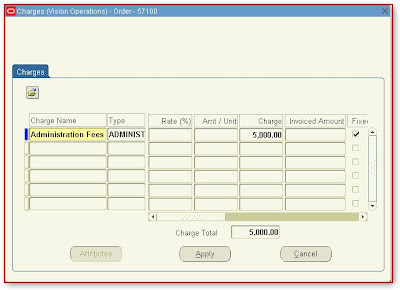
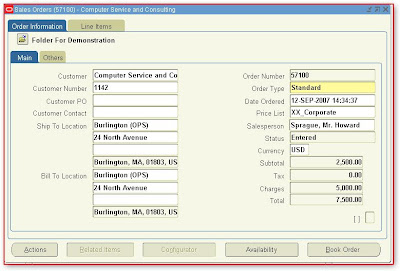
After Clicking on Action (B) a list of value will popped up select “Charges” as shown in picture below

A new interface will appear select charge “Administration Fees” defined earlier all related information automatically retrieved upon selection of charge name and


Wednesday, August 29, 2007
HOW TO SETUP DATABASE ROW CHANGES AUDIT TRIAL IN ORACLE APPLICATIONS
An Audit Trail retains a history of changes to data. It includes the following information:
1. What changed
2. Who changed it
3. When was the data changed
When you enter or update data in your forms, you change the database tables underlying those forms. An Audit Trail tracks which row in the database was updated at what time, and which user was logged in using the associated form(s). (Metalink)
Following are the steps required to set audit trial
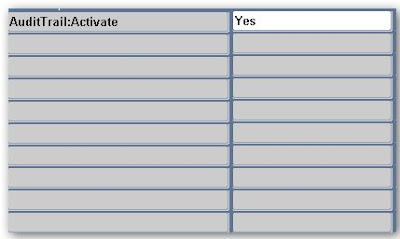
I. Set Audit Trail Profile Option
Login by Using System Administrator Responsibility
Navigate To
Profile --> System
And find the Audit Trail: Activate it should be set to Yes it is available on site level only. We Must Re Login into Application to Activate audit Trial in Current Session


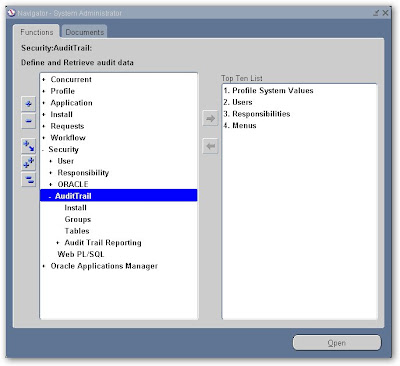
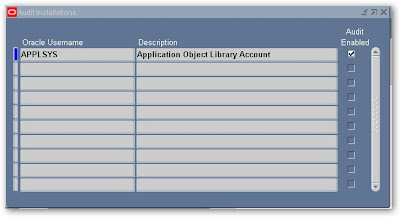
II. Select the Installations for Audit
Navigate To
Security --> Audit Trail --> Install
You will have to check all schemas enable for which you required audit trial and save the record first click on find button and find schema. Here I took fnd_user table for audit trial so I have to check APPLSYS as this table is in APPLSYS schema. Save the work after finding and filling information as shown in picture below

III. Create a New Audit Group
Navigate To
Security -->Audit Trail-->Groups
Fill the Form on Basis of required Information
1. Application Name
Select the name of an application to associate with your audit group. The combination of application name and group name uniquely identifies your audit group. An audit group may be used to audit tables in additional applications.
Value: - Application Object Library
Enter the name of the audit group.
Value: - FND_USER Audit Demo
Choose Enable requested if you are defining a new audit group
Value: - Enable requested
When you run the Audit Trail Update Tables report, the concurrent program creates database triggers for the tables in your audit group. Once you have run the program, this field displays Enabled for audit groups where Audit Trail is active.
Fill the table name for which you required Audit here in my case it is FND_USER and Save the new audit group
IV Define Table Columns to be Audited
Navigate To
Security --> Audit Trail -->Tables
For every table defined in step 3, you need to define the columns by using these steps –
Find the table name.

Primary key, Creation Date, Created by, Last Update Login, Last Update Date and Last Updated by Columns will always be saved.

V. Run Audit Trail Update Program
Navigate To
Requests --> Run
Run the Audit Trail Update Tables program to activate the auditing you can schedule this program depends upon available resources.


VI. How to get audit trial data
There are no standard Oracle Applications reports to access Audit Trail data you can only access audit trial data through SQL. All information related to auditing is stored in “shadow” tables for each audited table for which you enabled audit and these shadow tables named as tablename_A. Here in my case all information is stored in fnd_user_A.

Now after this transaction run the following query
SELECT audit_timestamp, audit_transaction_type, audit_user_name,
audit_true_nulls, audit_session_id, audit_sequence_id, audit_commit_id,
row_key, user_id, encrypted_user_password, last_updated_by,
password_accesses_left, password_date, encrypted_foundation_password,
user_name, created_by, employee_id
FROM applsys.fnd_user_a
Result in TOAD

VII. Purging Audit Trial Data
There is no standard purge program and the Audit Trail must be manually disabled to permit purging. Use the following procedure to purge audit date –
Navigate to
Security --> Audit Trail --> Groups

Run the “Audit Trail Update Tables” Report as mentioned above
II. Note 60828.1 - Overview of Oracle Applications Audit Trails
III. Note:105630.1 Setup & Usage (Audit Trail)
IV. Oracle Applications System Administration Guide
Wednesday, August 15, 2007
Oracle Advanced Supply Chain Planning
Oracle Advanced Supply Chain Planning has component based architecture that separates the transaction data and processing associated in a source instance from the planning calculations done in a destination instance.
The Oracle Advanced Planning can plan a single instance or multiple instances. An instance is a database and a set of applications.
There are several types of instances:
Source instances
Source instances hold source information, for example, items, bill of materials, Orders. Source instances are Oracle Applications instances (from releases 10.7, 11.0, and 11i) or legacy systems.
Destination instance
The destination instance (APS planning server) holds planning information. Planners use the planning server to store information collected from the source instances. Run, analyze, and simulate plans; and implement planned orders.
Oracle Advanced Supply Chain Planning consist of following modules
1. Oracle Collaborative Planning
2. Oracle Demand Planning
3. Oracle Global Order Promising
4. Oracle Inventory Optimization
5. Oracle Manufacturing Scheduling
Wednesday, August 8, 2007
Order Management Links Oracle Order Management Track
Visit following to find some useful information of order Management
Order Management Links Oracle Order Management Track
Order Management Links Oracle Order Management Track
How to get JV more then a specific Amount
Connect by Apps user name and just enter Amount when Prompted.We can use this query in Oracle Alerts to Notify GL Manager
SELECT gjh.NAME, gjh.running_total_cr, gjh.running_total_dr,
gjh.currency_code, gjlv.description, gsnv.NAME,
DECODE (NVL (gjlv.entered_dr, 1),
1, 'CREDIT',
gjlv.entered_dr, gjlv.entered_dr
) debit,
DECODE (NVL (gjlv.entered_cr, 1),
1, 'DEBIT',
gjlv.entered_cr, gjlv.entered_cr
) credit,
gjlv.period_name,
( gccv.segment1
|| ' '
|| gccv.segment2
|| ' '
|| gccv.segment3
|| ' '
|| gccv.segment4
|| ' '
|| gccv.segment5
|| ' '
|| gccv.segment6
|| ' '
|| gccv.segment7
|| ' '
|| gccv.segment8
) ACCOUNT,
gjlv.entered_cr, gjlv.entered_dr
FROM gl_je_headers gjh,
gl_je_lines_v gjlv,
gl_sob_names_v gsnv,
gl_code_combinations_v gccv
WHERE ( (gjlv.je_header_id = gjh.je_header_id)
AND (gsnv.set_of_books_id = gjlv.set_of_books_id)
AND (gjlv.code_combination_id = gccv.code_combination_id)
)
AND (gjh.running_total_dr > :amount OR gjh.running_total_cr > :amount)
Thursday, August 2, 2007

Why We Need Oracle Credit Management
Good customer scoring strategies will have better visibility, quicker decision making, reduces manual efforts and increase in the profitability
It can be easily configured on top of an existing 11i implementation
Easy configuration depending on requirements.
On line credit application and approval process will eliminate many home grown systems
Controls escalating and higher incidences of bad debts
Reduces collection cost and diminishing returns
Reduces the credit-to-cash life cycle
We can have aggressive and/or conservative credit policies based on customer classes
Track credit performances and history of credit decisions and run reports as needed
Continuous and scheduled periodic credit evaluations for high risk customers or for all customers
Matches global credit policies ( In MNC Scenario)
Strong internal controls
Lack of visibility in International Credit. Can handle financial risks in global market
Wednesday, August 1, 2007
TABLES & PROFILE OPTIONS ARE USED WITH THE MOVE ORDER FUNCTION
TABLES
1. MTL_TXN_REQUEST_HEADERS
This table stores all of the move order headers. The headers contain all information which pertains to entire move orders, including the transaction type of the move order, the move order type, the move order status, and the request number of the move order.
2. MTL_TXN_REQUEST_LINES
The table MTL_TXN_REQUEST_LINES stores all of the move order lines. The lines are requests to move some quantity of an item from a source location to a destination location or account. Each move order line must be tied to a specific move order header.When a line is detailed or pick released, the quantity detailed is updated appropriately and transaction lines are created in MTL_MATERIAL_TRANSACTIONS_TEMP. When the transaction lines are transacted, the quantity delivered is updated.
PROFILE OPTION
TP:INV Move Order Transact Form
This profile options will be set at Site Level with Following Possible values
On-line processing
Concurrent processing
Background processing
By Deafult it will be Online Processing
Monday, July 30, 2007
How to Get Single Employee with Multiple Rules in WorkFlow
Use Following Query to Get Multiple Rules Attached to a Single Employee
Connect to instance By Using APPS User Name
SELECT orig_system, description, orig_system_id, NAME "Login Name",
display_name "Employee Name"
FROM wf_local_roles wfr1
WHERE (wfr1.orig_system <> 'WF_LOCAL_ROLES' AND wfr1.orig_system_id <> 0)
AND EXISTS (
SELECT 'row found'
FROM wf_local_roles wfr2
WHERE ( wfr2.orig_system <> 'WF_LOCAL_ROLES'
AND wfr2.orig_system_id <> 0
)
AND wfr2.orig_system_id = wfr1.orig_system_id
AND wfr2.orig_system = wfr1.orig_system
AND wfr2.NAME <> wfr1.NAME)
ORDER BY orig_system
Get Report List With Parameters
Use this query to Get Report List along With Parameters
Connect with APPS Password
SELECT a.concurrent_program_name AS concurrent_program_name,
a.user_concurrent_program_name AS user_concurrent_program_name,
c.application_short_name AS application_short_name,
b.column_seq_num AS column_seq_num, b.srw_param AS param_seq,
b.form_left_prompt AS prompt,
d.flex_value_set_name AS values_set_name
FROM fnd_concurrent_programs_vl a,
fnd_descr_flex_col_usage_vl b,
fnd_application c,
fnd_flex_value_sets d
WHERE a.enabled_flag = 'Y'
AND a.concurrent_program_name =
SUBSTR (b.descriptive_flexfield_name, 7, 100)
AND a.application_id = c.application_id
AND b.enabled_flag = 'Y'
AND b.flex_value_set_id = d.flex_value_set_id
ORDER BY a.concurrent_program_id, b.column_seq_num
Saturday, July 28, 2007
Oracle Order to Cash Basics
If you want a high-level overview of Oracle Order to Cash then please visit the following link
http://www.bryanthompsononline.com/oracle/wp-content/uploads/2006/07/Oracle%20OTC.ppt
http://www.bryanthompsononline.com/oracle/wp-content/uploads/2006/07/Oracle%20OTC.ppt
Thursday, July 26, 2007
Tables Used in Pricing
Following Tables used to store all price List Data and used Frequently in reporting and oracle Internal operations
· OE_PRICE_ADJUSTMENTS
This table is used to store price adjustments that have been applied to an order or a line. The column automatic flag indicates if the adjustment was applied automatically or manually. Manual discounts are created with applied_Flag = Y.
SELECT price_adjustment_id, creation_date, header_id "Order Header",
automatic_flag "discount applied automatically",
line_id "ORDER LINE_ID",
orig_sys_discount_ref "Original discount reference",
list_header_id "Header Id of the Modifier",
list_line_id "Line id of the Modifier",
list_line_type_code "Line Type of the Modifier",
accrual_flag "adjustment is accrued", benefit_qty "Quantity accrued",
benefit_uom_code
FROM ont.oe_price_adjustments
· OE_PRICE_ADJ_ATTRIBS
This table stores information on qualifiers and pricing attributes, which to that corresponding price adjustment line qualified for “price_adjustment_id” is link between this table and ont.oe_price_adjustments
SELECT price_adjustment_id,
pricing_attr_value_from "from Value pricing Attribute",
pricing_attr_value_to "To Value pricing Attribute",
comparison_operator "Operators",
flex_title "pricing_context Flex_name", price_adj_attrib_id,
lock_control
FROM ont.oe_price_adj_attribs;
· OE_PRICE_ADJ_ASSOCS
This table stores the association between Order lines and price adjustments and also between price adjustments. One adjustment may be a result of benefit on one or more order lines. “price_adjustment_id” is link between this table and ont.oe_price_adjustments
SELECT line_id "Order Line Id", price_adjustment_id,
rltd_price_adj_id "price_adjustment_id"
FROM ont.oe_price_adj_assocs;
Wednesday, July 25, 2007
How to Get User's Status in the ICX_SESSIONS Table
Connect to Application by using apps user and run the following SQL Query
SELECT (SELECT user_function_name
FROM fnd_form_functions_vl fffv
WHERE (fffv.function_id = a.function_id)) "Current Function",
TO_CHAR (first_connect, 'MM/DD/YYYY HH:MI:SS') start_time,
TO_CHAR (last_connect,
'MM/DD/YYYY HH:MI:SS'
) "Date and time of last hit",
TO_CHAR (SYSDATE, 'HH:MI:SS') current_time, user_name, session_id,
(SYSDATE - last_connect) * 24 * 60 mins_idle,
fnd_profile.value_specific ('ICX_SESSION_TIMEOUT',
a.user_id,
a.responsibility_id,
a.responsibility_application_id,
a.org_id,
NULL
) TIMEOUT,
counter "How many hits a User has made",
a.limit_connects "No of hits allowed in session"
FROM icx_sessions a, fnd_user b
WHERE a.user_id = b.user_id AND last_connect > SYSDATE - 1 / 24;
Monday, July 23, 2007
Oracle Cash Management and Oracle Receivable
For Cash Management to work with Oracle Receivables, we need to establish the following in Cash Management:
· Set of Books
· Banks
· Receipt sources
· Receipt class (optional)
· Receivable activities (optional)
Set of Books
Set of Books must be assigned as system options in Oracle Receivables for each operating unit. We must also select these Sets of Books as the Sets of Books in the Oracle Cash Management System Parameters form.
Banks
We must configure bank accounts for banks that will be reconciled using Oracle Cash Management. We must mark the bank accounts with an account use of Internal—but not Customer or Supplier. We must also have the cash clearing, bank charges, and bank errors accounts set up in the GL Accounts alternative region of Bank Accounts. For remittance bank accounts, we need to assign the cash account and remittance account.
Receipt Sources
We need to define at least one receipt source that will be used for assigning numbers to receipt batches.
Receipt Class
If we are planning to create miscellaneous receipts or payments from Oracle Cash Management, we need to set up a receipt class for them. Miscellaneous payments are negative receipts, and are generated in Oracle Receivables, not Oracle Payables. The receipts class setup for this purpose utilizes a manual creation method and is set to not require remittance.
Receivable Activities
To create miscellaneous receipts or payments from Oracle Cash Management, we must set up a receivable activity.
Tuesday, July 17, 2007
Display database links with remote passwords
Connect to instance by using sys login (as sysdba)
Execute the following query
SELECT u.NAME owner, l.NAME "Dblink Name", l.HOST "Host Name",
l.userid || '/' || l.PASSWORD userpass
FROM SYS.user$ u, SYS.link$ l
WHERE l.owner# = u.user#;
Thursday, July 12, 2007
Accounts Receivable Profile Options
For the Accounts Receivable values the following are the most critical profile options and used to control Oracle Receivable functionality
AR: Allow Transaction Batching - If you enter small volumes of manual transactions, it is not necessary to use batches for transactions. If you enter high volumes, you should use batching for transactions. You should always use batching for receipts since you get immediate feedback of what you have done and any potential problems.
AR: Cash Allow Actions - As part of the cash application process, the applier has the option to create adjustments (write-offs) and charge backs if you set this option to Yes. I recommend that you do that, you can always control the amounts they write-off using approval limits.
AR: Cash - Default Amount Applied - Always set so the default is the amount remaining on the receipt, not the amount remaining on the invoice. If you allow the receipt amount to default to the invoice balance, this allows you to apply more than you really have.
AR: Change Customer Name - In reality customers change their names and this is a valuable feature but, I recommend that you set it "Yes" only after to have been live for a few weeks. This is a good way to keep novice users from overlaying good names with invalid names, until the know what they are doing.
AR: Close Period - Run Collections Effectiveness - I recommend that you set this option to "No." Most users do not use this report and it will just slow the close process.
AR: Update Due Date - Allow change to due date. In rare instances it is desirable to change the due date on an invoice (for example, you have negotiated this with the customer). By setting this profile option to "Yes," you have the option of doing this. What this really does is to allow you to make your aging look better. Consider whether or not this is desirable in you business situation.
AR: Use Invoice Accounting For Credit Memo - In most cases, if you know the original invoice, it is desirable to offset the accounts that were used for the invoice when creating the related Credit Memo. This option allows you to do that.
Tuesday, July 10, 2007
PURCHASE ORDER AND INVOICE MATCHING
Purchasing and Payables enable you to match invoices to purchase order shipments or purchase order distribution lines. There are following three ways to match Purchase Order and Invoices
2-way matching
This verifies that Purchase order and invoice information match within your tolerances as follows and check following:
Invoice price <= Purchase order price Quantity billed <= Quantity Ordered 3-way matching
This verifies that the receipt and invoice information match with the quantity tolerances defined and check following:
Invoice price <= Purchase order price Quantity billed <= Quantity Ordered Quantity billed <= Quantity received 4-way matching
This verifies that acceptance documents and invoice information match within the quantity tolerances defined and check following:
Invoice price <= Purchase order price
Quantity billed <= Quantity Ordered
Quantity billed <= Quantity received
Quantity billed <= Quantity accepted
Subscribe to:
Posts (Atom)