Showing posts with label Oracle Application Object. Show all posts

Thursday, September 27, 2007

How to enable the Cancel button on Application Login page

Oracle Applications provides the ability to include several optional attributes in the login page.

The attributes are as follows:

  1. Username Hint
  2. Password Hint
  3. Cancel Button
  4. Forgot Password Link
  5. Register Here Link
  6. Language Images

These attributes are controlled via a single profile option, "Local Login Mask" (FND_SSO_LOCAL_LOGIN_MASK).

In order to display one or more of these optional attributes on the Application Login page, add the numeric values of all desired attributes and then set the value of the profile option to that value "Local Login Mask".

Following is numeric value for each attribute

  1. Username Hint = 01
  2. Password Hint = 02
  3. Cancel Button = 04
  4. Forgot Password Link = 08
  5. Register Here Link = 16
  6. Language Images = 32

If you want to display the Cancel Button on the Application login page, then the profile value should be set to 04 Cancel Button . In order to display just the language images, set the profile value to 32.


Save the record after restarting Application services your login page looks like this


Wednesday, August 29, 2007

HOW TO SETUP DATABASE ROW CHANGES AUDIT TRIAL IN ORACLE APPLICATIONS

An Audit Trail retains a history of changes to data. It includes the following information:

1. What changed

2. Who changed it

3. When was the data changed

When you enter or update data in your forms, you change the database tables underlying those forms. An Audit Trail tracks which row in the database was updated at what time, and which user was logged in using the associated form(s). (Metalink)


Following are the steps required to set audit trial

I. Set Audit Trail Profile Option

Login by Using System Administrator Responsibility

Navigate To

Profile --> System

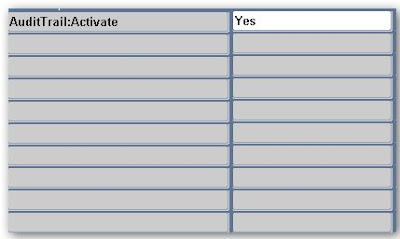
And find the Audit Trail: Activate it should be set to Yes it is available on site level only. We Must Re Login into Application to Activate audit Trial in Current Session


II. Select the Installations for Audit

Navigate To

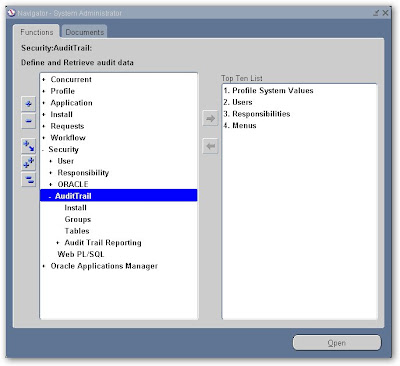
Security --> Audit Trail --> Install

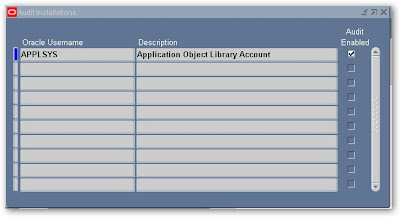
You will have to check all schemas enable for which you required audit trial and save the record first click on find button and find schema. Here I took fnd_user table for audit trial so I have to check APPLSYS as this table is in APPLSYS schema. Save the work after finding and filling information as shown in picture below


III. Create a New Audit Group

Navigate To

Security -->Audit Trail-->Groups

Fill the Form on Basis of required Information

1. Application Name

Select the name of an application to associate with your audit group. The combination of application name and group name uniquely identifies your audit group. An audit group may be used to audit tables in additional applications.

Value: - Application Object Library

2. Audit Group

Enter the name of the audit group.

Value: - FND_USER Audit Demo

3. Group State

Choose Enable requested if you are defining a new audit group

Value: - Enable requested

When you run the Audit Trail Update Tables report, the concurrent program creates database triggers for the tables in your audit group. Once you have run the program, this field displays Enabled for audit groups where Audit Trail is active.

Fill the table name for which you required Audit here in my case it is FND_USER and Save the new audit group

IV Define Table Columns to be Audited

Navigate To

Security --> Audit Trail -->Tables

For every table defined in step 3, you need to define the columns by using these steps –


Find the table name.


Primary key, Creation Date, Created by, Last Update Login, Last Update Date and Last Updated by Columns will always be saved.

Now add the audit required column in detail block as per following picture and save the record.

V. Run Audit Trail Update Program

Navigate To

Requests --> Run

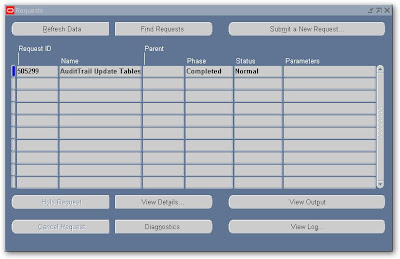
Run the Audit Trail Update Tables program to activate the auditing you can schedule this program depends upon available resources.

VI. How to get audit trial data

There are no standard Oracle Applications reports to access Audit Trail data you can only access audit trial data through SQL. All information related to auditing is stored in “shadow” tables for each audited table for which you enabled audit and these shadow tables named as tablename_A. Here in my case all information is stored in fnd_user_A.

I have created a new user by name of Pricing and change its password from older one to new one.

Now after this transaction run the following query

SELECT audit_timestamp, audit_transaction_type, audit_user_name,

audit_true_nulls, audit_session_id, audit_sequence_id, audit_commit_id,

row_key, user_id, encrypted_user_password, last_updated_by,

password_accesses_left, password_date, encrypted_foundation_password,

user_name, created_by, employee_id

FROM applsys.fnd_user_a

Result in TOAD

Query returns my user name and other information

VII. Purging Audit Trial Data

There is no standard purge program and the Audit Trail must be manually disabled to permit purging. Use the following procedure to purge audit date –

Navigate to

Security --> Audit Trail --> Groups

Select the “Security Audit” group and set the group state to “Disable – Purge Table”

Run the “Audit Trail Update Tables” Report as mentioned above

Purge the data from the shadow table

Troubleshooting

I. Note 105624.1 Troubleshooting Audit Trail issues.

II. Note 60828.1 - Overview of Oracle Applications Audit Trails

III. Note:105630.1 Setup & Usage (Audit Trail)

IV. Oracle Applications System Administration Guide


Monday, July 2, 2007

Check Profile and Value with level

SELECT (SELECT user_profile_option_name

FROM fnd_profile_options_tl fpot

WHERE TRIM (fpot.profile_option_name) =

TRIM (fpo.profile_option_name))

PROFILE,

fpov.profile_option_value VALUE,

DECODE (fpov.level_id,

10001, 'SITE',

10002, 'APPLICATION',

10003, 'RESPONSIBILITY',

10004, 'USER'

) "Apply On",

fa.application_name application,

fr.responsibility_name responsibility, fu.user_name "USER"

FROM fnd_profile_option_values fpov,

fnd_profile_options fpo,

fnd_application_tl fa,

fnd_responsibility_vl fr,

fnd_user fu,

fnd_logins fl

WHERE fpo.profile_option_id = fpov.profile_option_id

AND fa.application_id(+) = fpov.level_value

AND fr.application_id(+) = fpov.level_value_application_id

AND fr.responsibility_id(+) = fpov.level_value

AND fu.user_id(+) = fpov.level_value

AND fl.login_id(+) = fpov.last_update_login

ORDER BY 1, 3

Friday, June 22, 2007

How to change Message Displayed on invalid login Information

We are going to change the message displayed in e business suite on invalid login information

Login by Sys Admin Login and Navigate to Application Developer Responsibility

Menu Navigation

Application ----> Messages


Query for “FND_APPL_LOGIN_FAILED” Change the Message Display in Current Message Text


After Saving Record Reboot application tear services.

Tuesday, June 19, 2007

Oracle Identity Management and Oracle AS Single Sign-On

Oracle Application Server provides a security framework that incorporates the different key components here I discuss oracle identity management

Oracle Identity Management supports a variety of complex password policies. These fall into two categories:

  • Value-based policies (including minimum lengths and the presence of a minimum number of special characters)
  • State-based policies (e.g., expiration and maximum number of retries)

Many users face a proliferation of passwords as they gain access to more applications and systems. Because it is so easy for users to forget passwords when they have so many to remember, users may end up writing them down in public places, thus creating a security risk. Oracle Identity Management can help lift this burden on users by enabling deployment of single sign-on, allowing a single user and password combination across these applications and systems.

Follow these steps to set up a basic single sign-on system:

  1. Install the identity management infrastructure database, database server, and single sign-on servers using the Oracle Universal Installer.
  2. Configure the HTTP servers in the single sign-on middle tier.
  3. Configure the HTTP hardware load balancer or Oracle AS Web Cache.
  4. Configure the identity management infrastructure database single sign-on server to accept authentication requests from an externally published address of the Oracle AS Single Sign-On server.
  5. Re Register the mod_osso (Oracle AS Single Sign-On extension) to the Oracle AS Single Sign-On middle tier.

Monday, June 18, 2007

How to Implement Function Security for Orders and Returns in Order Management 11.5.10.2

Use function security to control user access to functions in the Order Organizer and Sales Orders window. Your system administrator customizes a responsibility at your site by including or excluding functions and menus in the Responsibilities window.

The form functions listed below are available by default, but may be excluded from menus tied to restricted responsibilities:

• Sales Orders

• Order Organizer

• Order Organizer View

Note: The functions Returns: Enter and Returns: View are available for backward compatibility with older releases of Oracle Order Entry. Do not use these for new installations. If you exclude Sales Orders, Order Organizer, and Order Organizer View from a responsibility, that responsibility’s users can neither access the Sales Orders window by selecting from the Navigator menu nor query orders from the Orders Organizer. If you exclude all three functions, you should also remove the Orders, Returns menu item from the Navigator.

• Sales Orders and Order Organizer gives you the right to view, enter or modify orders and returns.

• Order Organizer View only enables you to view the orders in the Sales Orders window from the Order Organizer.

Additionally, utilizing standard form functional security, you can restrict actions that a user can perform in the Sales Order window by adding or removing these functions from the menu associated with a responsibility. Below lists the following actions that can be restricted using this feature.

Apply Holds

Authorize Payment

Book Order

Calculate Tax

Cancel Orders

Charges

Configurations (Link, Delink, Match & Reserve)

Copy Orders

Gross Margin

Mass Change

Send Notifications

Price Orders

Progress Order

Release Holds

Sales Credits

Schedule Orders

Function Security Example

Your company employs some individuals whose tasks include viewing orders and returns. They do not enter orders or returns.

Before Applying Any Rule for user Ahmad Bilal


Now we will process function security rule for User Ahmadbilal

1. Navigate to the Responsibilities window. Query an existing responsibility “Order Management Super User, Vision Operations (USA)” whose functionality you want to limit, or define a new one.


In the Function and Menu Exclusions block, choose Function as the type of exclusion Rule to apply against the responsibility. Here we have restricted two function within this responsibility

a. Book Order

b. Price Order

And save work


Again switch back to Order Management Super User, Vision Operations (USA) Responsibility and query and existing order with status entered


Look in below picture there is no book Order Button and price order also disappear from action list


Friday, June 15, 2007

How to Setting your Oracle Applications session: fnd_global.apps_initialize (org_id)

If we are working with Oracle Applications, here how we can initialize our session in whichever tool we are using to take off the login process and pick up profile option values.

The key profile option is usually org_id (organization id in Multi-Org Environment) so we can select from organization aware views, but it applied equally to other profile options,

For Example.

We can then use FND_PROFILE.VALUE('PROFILE_OPTION_NAME') to get values from profile options.
We need to be logged into the database as the APPS user. The examples set up the session for SYSADMIN user, System Administrator responsibility.
E.g. SQL*Plus

Exec fnd_global.apps_initialize(0,20420,1);


E.g. for PL/SQL, TOAD, SQLDeveloper, SQL Navigator etc.:

Begin fnd_global.apps_initialize(0,20420,1); end;


The parameters used
in above example are:

1. User_ID

SELECT user_id, user_name, description FROM applsys.fnd_user

2. Responsibility_ID

SELECT application_id, responsibility_id, LANGUAGE, responsibility_name, created_by, creation_date, last_updated_by, last_update_date, last_update_login, description, source_lang, security_group_id FROM applsys.fnd_responsibility_tl

3. Responsibility_Application_ID

SELECT application_id, responsibility_id, LANGUAGE, responsibility_name, created_by, creation_date, last_updated_by, last_update_date, last_update_login, description, source_lang, security_group_id FROM applsys.fnd_responsibility_tl

To get these we have a couple of choices

1. SQL - Replace SYSADMIN and System Administrator with your user and responsibility:

2. In Oracle Applications forms session. Login as your user and navigate to the required responsibility.
Open a function that uses Oracle forms. Go to Help > Diagnostics > Examine. In the Block enter $PROFILES$. In the field enter the appropriate field name for the parameter:

User_ID = USER_ID

Responsibility_ID = RESP_ID

Responsibility_Application_ID = RESP_APPL_ID

Friday, June 1, 2007

Multi-Organization in Oracle e business Suite

Oracle Applications 11i (Oracle e business Suite) has a feature called Multi-Organization, what brought a lot of benefits for an Organization which has multiple business units. Using the Multi-Organization enhancement, this kind of company will need only one single instance to support its business, keeping transactions data separate and secure.

This model allows you to support any number of business units on a single instance of any Oracle Applications product, even if those business units use different Set Of Books. Now we are able to define different structures to customize Oracle Applications according to our business need.

The basics business needs are:

  • Sell products from a legal entity which uses one set of books and, ship them from another legal entity using a different set of books.
  • Purchase products through one legal entity and receive them in another legal entity.

  • Use a single installation of Oracle Applications product to support any number of organization
  • Support any number of legal entities within a single installation of Oracle Applications.
  • Secure access to data, so users can access only the information that is relevant to Them

The Oracle Applications multi-org structure is defined base on the picture Above

This structure is the first definition that has to be done when implementing Oracle e-Business suite. It has to be done carefully, since it is not possible to change after it is defined in the system. After the structure has already been defined, the Multi-Organization Company will be ready to use the single instance of Oracle Applications.

Wednesday, May 30, 2007

Submit Concurrent Requests at the OS level

CONCSUB is a utility for allowing the Sysadmin user name and password to have the ability to submit concurrent requests at the OS level. This utility, unlike many of the Applications utilities, is not menu driven. It runs from the command line, submits a concurrent request, and returns you to the command prompt once the concurrent request completes. You can check the status of your concurrent request via the Concurrent Request form


Syntax

CONCSUB applsys/pwd 'responsibility application short name' 'responsibility name' 'username' [wait=] CONCURRENT 'Program application short name' PROGRAM

CONCSUB Parameters and Their Meanings

Applsys/pwd

Oracle application user name and password that connects to Applications Object Library.

Responsibility Application Short Name

Application short name of the responsibility you want to run the request for.

Responsibility Name

Name of the responsibility for which you want to run the request.

Username

User name of the person who is submitting the request.

Wait

Do you want CONCSUB to wait before returning the OS command prompt?

N (default value) waits until the job completes.

Y returns you to the command prompt.

"n" is the number of seconds to wait before it exits.

If this parameter is used, it has to come before concurrent.

Program Application Short Name

Short name of the program (for deactivate, abort, and verify, the program application short name is FND).

PROGRAM

The program to submit (e.g., DEACTIVATES, VERIFY, ABORT).


Different Types of Concurrent Manager

Different Types of Concurrent Manager

Conflict Resolution Manager (CRM)

The Conflict Resolution Manager enforces all compatibility rules and based on priorities and run rules, determines

which jobs can run when if there is a conflict in timing. You cannot change its definition, but can set its values for sleep

time for each work shift or for parallel Concurrent Processing, if applicable.

Product Specific Concurrent Manager

There are many product specific Concurrent Managers. The list includes

Inventory, MRP, and Projects, as well as any

User-defined managers. These managers are specialized to perform Concurrent Processing specifically for those

products for which they are built. Utilizing these managers can help you off-load some of the processing from the

Standard Manager.

Internal Concurrent Manager (ICM)

The Internal Concurrent Manager (ICM) is the controlling manager for all of the others. When you start the Concurrent

Managers, this is the only one that you actually have direct control over. This manager in turn starts all of the others

depending on their schedules and work shifts. It controls starting and stopping all other managers based on the

definition of their work shifts and it monitors for failures. If there are failures, it cleans up after them. Its definition

cannot be changed after its startup. On starting, you can, by parameter passing, set its values for sleep time, PM ON

on cycle, and queue size.

Scheduler Manager

The Scheduler Manager, added in 11i, assists the ICM and the CRM in scheduling and conflict resolution.

Standard Manager

The Standard Manager (as the name implies) is the manager that ships with the Oracle E-Business Suite and accepts

any and all requests and does not, as configured, have any specialization rules. The Standard Manager is

Customizable but care needs to be taken to ensure that, if you change the rules on the Standard Manager, that all jobs

Have a manager that is able to run them.

Transaction Managers

Conventional Concurrent Managers run batch type jobs that are typically long running, involve large amounts of data,

and run asynchronously. Transaction Managers run synchronous processing of certain reports requested from a client

Program but run as a server side program. These managers run as immediate programs, are started automatically by

the ICM, and communicate with Transaction Managers automatically. Running the job is transparent to the calling user

as the job runs extremely quickly and in real time. The calling client is notified of the ultimate outcome of the program

Execution by a completion message and a set of values returned to them.

A Transaction Manager is owned by an application and associated with a data group. Due to this association, and the

fact that it runs immediate programs, the Transaction Manager can only run programs contained within its program

Library.

$FND_TOP/sql/afcmstat.sql script gives you a list of concurrent managers and their respective status


Executable Concurrent Manager Description

CYQLIB Capacity Manager.

FNDCRM Conflict Resolution Manager.

ARLIBR Receivables Tax Engine.

FNDIMON Internal Monitor.

FNDLIBR Applications Object Library (AOL) — The ICM and the Standard Manager are both members of this library.

FNDSCH Scheduler Manager.

INVLIBR Inventory Manager Library.

MRCLIB Oracle MRP Library.

PALIBR Oracle Project Accounting.

POXCON Purchase Order Document Approval.

RCVOLTM Receiving Transaction Manager.